When it comes to creating a professional and polished PowerPoint presentation, one key aspect to consider is alignment. Proper alignment can make a big difference in the overall look and feel of your presentation, making it appear more organized and easy to read. However, keeping alignment can be a bit tricky, especially if you’re working with a lot of different elements on the slide. In this blog post, we’ll go over some tips and tricks for keeping alignment in your PowerPoint presentation.
Use Built-in Alignment Tools in PowerPoint
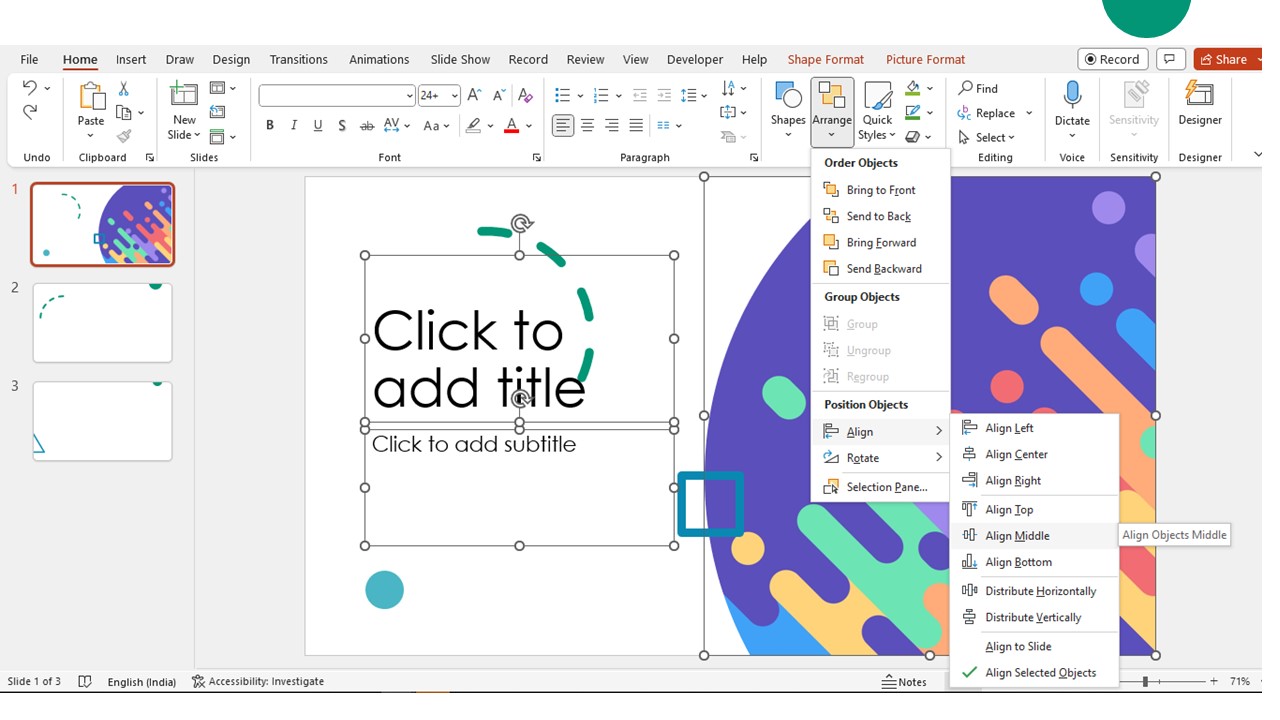
The first step in maintaining alignment in your PowerPoint presentation is to use the built-in alignment tools. These tools can be found in the “Home” tab of the PowerPoint ribbon. Under the “Align” group, you’ll find options to align objects (such as text boxes and images) with each other or with the slide. For example, you can use the “Align Left” option to align all of the objects on the slide to the left edge, or the “Align Center” option to center them all.
Use evenly distribute tool in PowerPoint
Another built-in tool that can help with alignment is the “Distribute” tool. This tool allows you to evenly space objects within a slide. For example, if you have several text boxes that you want to center on the slide, you can select them all and then use the “Distribute Horizontally” option to space them out evenly. This is a great way to ensure that your objects are aligned and spaced in a visually pleasing way.
How to use Gridlines or Guides Feature for better alingment
One other feature that can help with alignment is the “Gridlines” feature. This feature can be turned on by going to the “View” tab and selecting “Gridlines.” Once you’ve turned on gridlines, you’ll see a series of lines that cover the slide. These lines can be used as a guide to help you align objects. For example, if you want to align a text box to the center of the slide, you can use the gridlines to help you position it exactly in the middle.
Finally, you can use the “Snap to Grid” option to help with alignment. This option can be found in the “View” tab, and when it’s turned on, it will automatically align objects to the gridlines as you move them. This can be a real time saver if you’re working with a lot of different elements on the slide, as it will ensure that everything is perfectly aligned.

Other Powerpoint alignment tools should be considered while preparing your presentation
In addition to these built-in tools, there are also some other things you can do to keep alignment in your PowerPoint presentation. One thing to keep in mind is that consistency is key. When working on your presentation, try to use the same typeface and font size throughout the entire presentation. This will help to create a cohesive look and feel, and it will make it easier for your audience to follow along.
Another thing to keep in mind is the use of white space. White space is the empty space around the objects on your slide. By using white space effectively, you can create a more visually appealing presentation that is easier to read. For example, you can use white space to separate different sections of your slide, or to create a sense of hierarchy by placing the most important elements in the center and the less important elements around the edges.
Finally, it’s also important to keep your slides simple. Avoid cluttering your slides with too many different elements. Instead, focus on a few key points and use images and graphics to help convey your message. By keeping your slides simple and easy to read, you’ll be able to keep alignment and make your presentation more effective.
Conclusion
In conclusion, alignment is an important aspect of any PowerPoint presentation, and it can make a big difference in how professional and polished your presentation looks. By using the built-in alignment tools and keeping consistency throughout the presentation, using white space effectively, and keeping slides simple, you can create a presentation that is easy to read, visually appealing, and polished. Remember to use the “Align” and “Distribute” tools in the “Home” tab, turn on “Gridlines” in the “View” tab and use the “Snap to Grid” option to keep everything aligned. By following these tips, you’ll be able to create a presentation that is sure to impress your audience.